| Customer Information |
Overview
Click-N-Ship® (CNS) is a convenient application for residential and small business customers to create postage labels online. Easily print domestic and international shipping labels.
With just a few clicks, you can set shipping preferences and print postage labels from your home or office. All you need to get started is a free USPS.com residential or business account, computer and standard printer. If you do not have a printer available, check out our Label Broker® option which allows to print your CNS labels at the Post Office™.
To get started using Click-N-Ship, create a new or sign into an existing USPS.com® business account or personal account and visit cnsb.usps.com. After signing into your account, you will be able to print and pay for shipping labels, schedule a pickup, create an address book and more.
Quick Tip: If you're using a computer, use CTRL F to search for words or phrases within this FAQ article.
How to use CTRL F on an iPhone
- Tap the Share button (the square with an arrow pointing up, located at the bottom of the screen).
- Scroll down the menu and tap Find on Page.
- Type your word or phrase into the search bar that appears.
- Use the up and down arrows to jump between highlighted instances.
How to use CTRL F on an Android phone
- Tap the three dots menu icon in the top right corner.
- Select Find in page... from the list.
- Type the word or phrase you are looking for into the search bar at the top.
- Use the up and down arrows to cycle through the highlighted matches.
Available Products - Domestic and International Services
Products available with Click-N-Ship®
First-Class Mail® Letter
Priority Mail Express®
Priority Mail®
Priority Mail Cubic
USPS Ground Advantage®
USPS Ground Advantage Cubic
First-Class Mail® Large Envelope
Parcel Select®
Priority Mail Express International®
Priority Mail International®
First-Class Package International Service®
For information on additional postage options, please click here.
Additional eligible and ineligible products
Additional products available only for USPS.com business account customers
USPS Connect® Local
USPS Connect Regional
USPS Connect Local Mail
For information on additional postage options, please click here.
Ineligible for Click-N-Ship®
First-Class Mail International®
See PC Postage® vendors for additional postage options.
Creating and Printing Labels
The Click-N-Ship® application allows business and personal account customers to more efficiently create, print and pay for shipping and return labels.
Creating Labels
The Click-N-Ship Label Creation User Guide, May 2026 will help you get started creating labels.
|
Note: Business Account customers are now required to enter a package weight for Flat Rate packaging when creating your online label.
|
Click on a link below to open that section of the user guide. Below are the different label creation methods offered in Click-N-Ship:
- Creating a single domestic label (Classic View)
- Creating a single international label (Classic View)
- Creating a single domestic label (Quick-Flow View)
- Creating a single international label (Quick-Flow View)
- Creating labels using a USB scale
- Creating a batch of labels
- Importing multiple labels (up to 1000) via file upload
- Creating multiple labels in Label Manager by starting from your Address Book
- Creating a single drop shipment (Business Users Only)
|
Note: Your online label cannot be altered and must be used as it was printed.
- If you find an error in your label, print a new label with the correct address and request a refund.
- Any item with a manually-altered online label will be returned to you.
|
Naming and Searching Batches of Labels
You can name batches of labels during the Create a Batch and Import Labels label creation processes. Naming a batch allows you to see the associated Batch Name and Batch Symbol throughout the entire multi-label creation and payment process once the batch has been saved to Label Manager. You can also Filter Search by Batch Name in Shipping History (Order History).
Priority Mail Open & Distribute (PMOD) Labels
Business users can now utilize a new Open and Distribute drop shipment feature in Click-N-Ship to create a container label with the PMOD Service via single label creation. To learn more about creating PMOD labels, refer to the Single Label Creation User Guide or to the article What is Open and Distribute Service?.
Extra Services listed will vary depending on the service and package type selected. Extra Services offered could include:
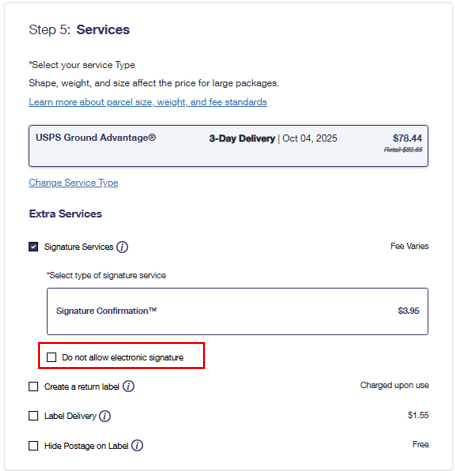
Electronic Signature Online - Opt Out Option for Shippers
USPS Electronic Signature Online® (ESOL®) is a feature that allows recipients to electronically sign for certain items that require signature for delivery. USPS ESOL is only available to residential Informed Delivery® (ID) customers that opt in to this service.
Shippers can opt out of the ESOL service option and require a physical signature, by following the steps below when creating a label:
- Once on Step 4: Select Extra Services of the single label flow, refer to the Signature Services section and select Signature Confirmation™.

For eligible mail pieces:
- If you do not want to allow for an ESOL, select the Do Not Allow Electronic Signature checkbox.
- If you do want to allow for an ESOL, uncheck the Do Not Allow Electronic Signature checkbox.
- To receive a copy of the signature, track your mail item on USPS.com then select Proof of Delivery. Follow the provided directions to receive an email with the delivery details after the item has been delivered.
Printing Labels
Once you have created your Click-N-Ship label, it will show in your Label Cart. You will have the following options to print your label(s):
- Print your labels at home Save the labels as a PDF and print now or later
- Have your local Post Office print your labels by selecting the Label Broker® Feature
|
No access to a printer?
Check out the Label Broker® feature with the Click-N-Ship application. You can pay for your shipping label using the Click-N-Ship application and select the "Print Labels Later at the Post Office" option. A QR code will be emailed to you to take to a Post Office™ location with your package. The Retail employee at the Post Office location will scan the code, print the label, affix it to the package and induct it into the system for processing. See the article Label Broker for more information. |
Before you print
What kind of printer and paper should I use to print CNS labels?
- Laser printer.
- High quality ink jet printer. For ink jet printers, 600 dots-per-inch (DPI) is recommended.
- Self-adhesive labels recommended.
- Plain white paper is acceptable. Do not tape over the "Postal Use" area on labels or cover barcodes. Tape makes it difficult for processing equipment to read the labels.
- Online labels should print to be approximately 4" x 6". If the label is too small, you may need to adjust your desktop font size or display settings, as they may not be readable by the scanning equipment.
Computer settings and required applications
- First-time users may see a pop-up screen instructing you to install Adobe Reader software. This download must be installed for the label to print. The link to download the latest Adobe Reader version is available on the Payment Confirmation page.
- To ensure proper printing of labels, please ensure that you have the 'block pop-ups' setting disabled from your browser and/or device. If this setting is not disabled, Click-N-Ship will notify you via a warning message via the Payment Confirmation page (see below):
Payment Confirmation Page (Desktop View)

Payment Confirmation Page (Mobile View)

Warning Message:
"We have detected that you have a pop-up blocker enabled, which may interfere with printing labels successfully. Please disable your pop-up blocker in your browser settings if you are having issue printing a label."
Printing two labels per page
This feature only applies to labels that do not include a customs form. Check the radio button next to the print option, Print labels without receipt (2 per page) to print two (2) upright (2-Up) labels per piece of paper rather than one (1) label and the receipt.
- Labels will print as two (2) 4 inch by 6½ inch Click-N-Ship® Domestic labels on one piece of self-adhesive 8½ inches by 11 inches medium paper.
- Customers will have access to all of the label information online through the following options:
- To access the information that would typically be printed on a receipt, customers should review the information provided on the Print Confirmation page (printer friendly option as well), or
- Select the Shipping History tab on the Click-N-Ship toolbar to review all of the information.
Additional information
- It is important that you mail your item on the Shipping Date you selected during the label generation process as an electronic record is automatically created for that label on that specific date. Labels with "stale" Shipping Dates (i.e. mailed after the Shipping Date printed on the label) may be returned to you.
- It is recommended that you use United States Postal Service® packaging or stickers when using Click-N-Ship labels to clearly indicate the type of service you have purchased.
Printing Labels for Domestic, International and APO/FPO/DPO Destinations
Printing domestic Click-N-Ship labels
- With Priority Mail® service and select services, you may receive USPS Tracking® at no additional charge; Signature Confirmation™ may be available at a lower price. Delivery information is found in your Shipping History or by using our USPS Tracking tool at USPS.com®.
- The Click-N-Ship® Priority Mail Express® label will only print one copy that is attached to the package.
- See above for information on printing 2 labels on a page. This is only available when a customs form is not required.
Printing international or military (APO/FPO/DPO) Click-N-Ship labels requiring customs forms
Printing an international label is much like printing a domestic label, however there are special considerations due to custom forms requirements. You will have the following options to print your label(s):
- Print your labels at home
- Save the labels as a PDF and print now or later
- Have your local Post Office print your labels by selecting the Label Broker® Feature
BEFORE YOU PRINT:
- For Priority Mail Express International® and Priority Mail International® services, if there are multiple copies of your electronically generated customs form, they must be inserted in the plastic envelope required for online international services. These plastic envelopes, PS 2976-E, Customs Declaration Envelope, the smaller PS 2976-ES, Small Customs Declaration Envelope, and shipping supplies are available free of charge at your local Post Office™ location, from the Packing Supply Center, or online at The Postal Store®.
- Note: The Packing Supply Center can be reached via phone at 1-800-610-8734.
- When printing certain labels, including PS Form 2976, an envelope (PS Form 2976-E/ES) is not required. You need only apply the label directly to the package or envelope. Here are examples of products that include PS Form 2976:
- Certain Priority Mail International® labels
- First-Class Package International Service® labels
- Military / US Possessions, Territories, and Freely Associated States (PTFAS) labels
- As described above, more than 2 labels cannot be printed on a single page if your label requires a customs form to be printed out.
- NOTE: Letters & Flats stamps can only be printed using the 6 x 4 print option. You cannot print a SCAN form or use the USPS Label Broker print option for your stamps from the Payment Confirmation page.
Affixing Labels to Packages and to Letters & Flats (Large Envelopes)
Packages
Labels must be fully placed on the address side of the package and not folded over package edges. Use clear shipping tape to securely affix labels on all four sides. Do not tape over the "Postal Use" area on Priority Mail Express® labels or the barcodes. Do not bend, fold, or overlap labels.
Letters and Flats (Large Envelopes)
Make sure the addresses are parallel to the longest side of the letter or flat. Place the label on the upper right corner of the letter or flat. For letters, make sure the bottom of the delivery address is at least 5/8" from the bottom of the envelope.
|
Example of Label Placement on Envelope

|
- As described above, more than 2 labels cannot be printed on a single page if your label requires a customs form to be printed out.
What if I accidentally printed a second (duplicate) label?
Since you were only charged once for postage, you should discard the duplicate label. The postage is linked to the label number, which is unique and can be used only once. The label number will appear in a duplicate postage list in the United States Postal Service® database that is monitored by the Postal Inspection Service. If a customer intentionally uses a duplicate label, they will be liable for fraud.
Creating Return Labels
Business Shippers can generate return labels for outgoing shipments to their customers. Creating a return label is free and you, the shipper, will only be charged fees once the return label has been used. A returns label cannot be created without an associated outgoing shipping label purchased through Click-N-Ship®. Once a customer uses the Return Label, you will receive an email notifying you that a charge was made and the label will appear in your Shipping Cart. You will need to log into your Click-N-Ship account to pay for the used Return Label. Return labels must be used within 30 days of the ship date of the label used to ship the item(s) to the recipient.
Label Manager and Label Cart
The Click-N-Ship Label Manager feature helps you organize and store your labels prior to purchase. It offers the following label actions on a single label or multiple labels at once. The Click-N-Ship Label Cart feature allows you to review, edit and pay for your labels.
NOTE: The following label actions are not eligible for one or more PMOD labels that are saved to the Label Manager. To edit a PMOD label, select Edit, and make the necessary updates to the label from the single label creation page.
Label Manager - Organize Labels
|
Available Actions in Label Manager
| | Edit | Edit a single label or multiple labels directly from your label manager. You can update the label's service and mailpiece type, add extra services, or even change the label's recipient information right from the Label Manager. | | Duplicate | Duplicate a label and the original label information will be copied onto a new label within the Label Manager. | | Flag as Priority | Flag a label that you would like to review. | | Add to Batch | Add labels that you would like to group together into a batch. | | Delete | Delete any labels that you would no longer like to purchase. | | Delete All Labels | Delete multiple labels at a time that you would no longer like to purchase. | | Add to Cart | Add all completed labels that you would like to purchase to your Label Cart. | | Create Return Label | Allow shippers to generate return labels when creating labels for shipments to their customers. |
Label Manager Screenshot
\" tab that is under the paragraph that says \"Manage, organize, and edit your saved shipping labels, group them into batches, and prepare them for purchase on this page.\"")
|
Label Cart - Review, Edit and Pay for Labels
Within the Label Cart, you will be able to see an overview of the labels that you've created and are ready for purchase.
From the Label Cart, you can:
- Review all labels
- Edit labels
- Remove one or more labels from the cart
- Add free USPS Shipping Supplies to your order
- Request a Pickup
- Create a new label, if needed
Once you are ready, proceed to the payment screen to complete your purchase.
Payment Methods Accepted in Click-N-Ship
Personal or Business Accounts
Business Accounts Only
Within Click-N-Ship®, customers can pay for their label(s) via:
- Debit / Credit Card
- PayPal
- Apple Pay
Business account customers have access to the following payment methods.
- Enterprise Payment System (EPS)
- EPS via the 3rd Party Authorization feature
- Official Mail Accounting System (OMAS) (federal agencies only)
Managing the Address Book - Creating and Managing Contacts and Groups
- Your Click-N-Ship® Address Book can store up to 5,000 addresses. You can import any number of new addresses until your Address Book reaches that limit.
- The Click-N-Ship Address Book will allow you to add contacts to new or existing Address Groups and Subgroups. As your needs change, the Address Book functionality is flexible enough to change along with it. There is a limit of 500 addresses per group.
- To get started, click on the Address Book tab in the Click-N-Ship toolbar (Create Label, Preferences, Shipping History, Address Book, Shipping Cart tabs). You can also click on the contact name to display the details of your address. From here, you will be able to edit your contact information in addition to adding or removing your contact from groups or subgroups.
How to Refund Unused Labels
Unused Click-N-Ship® labels
As a Click-N-Ship® customer, there may be instances where you need to request a refund for a label such as:
- You decide not to ship your package after you have created your label
- You were not able to print your label before 11:59pm on the Ship Date
- You find an error in your label after it has been printed (i.e. printed with no barcode, wrong ship date)
NOTE: If you would like to request a refund for a label that is on a SCAN Form, do not use the SCAN Form for the remaining labels. The remaining labels you do not wish to refund should be scanned individually.
For more information on Click-N-Ship SCAN forms, please see Click-N-Ship® SCAN Form.
Refund timeframe
Click-N-Ship® labels are eligible for refunds within 30 days of the label creation date. To request a refund, log in to Click-N-Ship and view your Shipping History. Labels are eligible for refunds if:
- A barcode scan event does not show up in our system
- A refund has not been previously requested or processed for the label
If it has been more than 30 days from the label creation date, but less than 60 days, you can initiate a refund by e-mailing the Click-N-Ship Help Desk at Email Us. Include the following information in your e-mail:
- Username
- Click-N-Ship account number
- Label number
- Transaction number and date
Requests for refunds will not be granted after sixty (60) calendar days (2 credit card billing cycles) have elapsed from the date the label was created.
The refund request will be verified and processed, and your original payment method will be credited if approved. Posting to your account is dependent upon your financial institution. You will receive an email notification after you request your refund and once your refund request has been approved or denied.
- Refund requests for Click-N-Ship labels will process 14 days from the date of the refund request.
Refunds at the Post Office - Priority Mail Express Service Failure and Signature Confirmation
Priority Mail Express® service refund
Click-N-Ship customers are eligible for a service related refund if Priority Mail Express was purchased and is listed on the Label.
- You may go to a Post Office™ to request a service related refund.
- You may request a service refund for your Priority Mail Express® label by viewing the Label Details for that label and clicking "Request a Service Refund" or by visiting the Service Refund application and entering in the label number for the label you want to request a service refund for.
- The service commitment for Priority Mail Express varies based on the time the item is mailed, where it is deposited and the destination.
Signature Confirmation™ refund
- The refund process for Signature Confirmation™ fees for online labels can be requested at your local Post Office™.
- A Refund for a Signature Confirmation™ service for online labels can be requested through Click-N-Ship by viewing the Label Details for that label and clicking "Request a Service Refund" or by visiting the Service Refund application and entering in the label number for the label you want to request a service refund for.
How to request a refund online
There are two ways to request a refund through the desktop site: either from Shipping History within the Order Details page or from Shipping History within the Label Details page. Refunds can also be made from your mobile device.
In both cases, you must first locate the specific label you would like to request a refund for on the Shipping History tab. For detailed instructions on requesting a refund, see the Click-N-Ship Shipping History May 2026.pdf.
|
Order Details Page View (Desktop View)
- Select the checkbox of the specific label that your would like to refund.
- Select Refund from the available actions above the label list OR from the drop down menu by clicking the 3 dots on the right side of the label row and clicking on Refund.

|
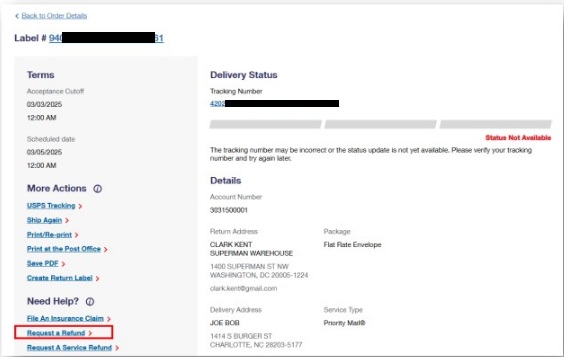
Label Details Page View (Desktop View)
- Select Request a Refund from the left side of the page and follow the prompts.
| |
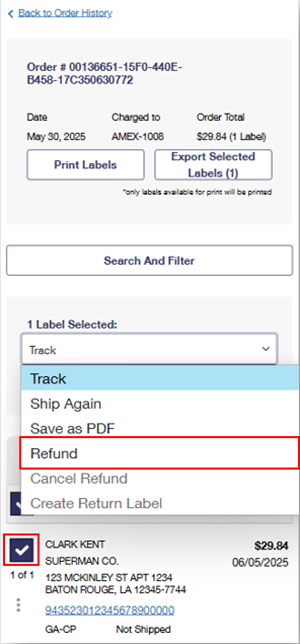
Order Details Page View (Mobile View)
- Select the checkbox of the specific label that your would like to refund.
- Select Refund from the available actions above the label list OR from the drop down menu by clicking the 3 dots on the right side of the label row and clicking on Refund.
|
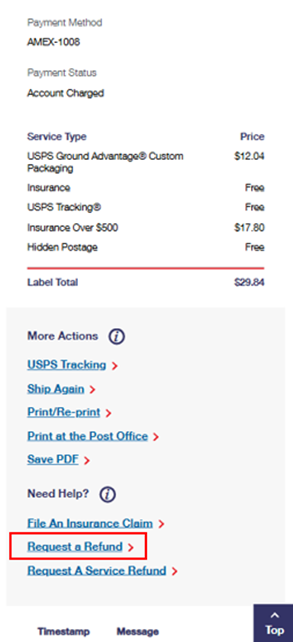
Label Details Page View (Mobile View)
- Select Request a Refund from the left side of the page and follow the prompts.
| |
Note: You will not be able to request a refund for First-Class Mail®️ items such as letters or large envelopes from either page. If you attempt to do so, you will be instructed to submit your request through Email Us - Click-N-Ship.
| |
Order Details Page

|
Label Details Page

|
Click-N-Ship Help Desk Information
- Email Us, click on "USPS.com", and select the reason for your email
- Call 1-800-344-7779
- Customer Service representatives are available as follows:
How to Pay Postage Due
Postage Due may appear in your Click-N-Ship account for several reasons, including a used Return Label, inaccurate weight entry, other input errors when creating a label or reuse of a label.
You will see a Postage Due message on your Click-N-Ship landing page if you have any postage due.
- You can select View Details to see if Return Labels were scanned, the reason for postage due and the postage owed for each label.
- To pay the postage due owed, select Pay Now in the Postage Due message or select your Label Cart in the upper right corner of the Click-N-Ship landing page.
Any Postage Due labels pending in Legacy Click-N-Ship were automatically moved over to Click-N-Ship on 2/28/25. You can pay the postage due either by clicking Pay Now on the home page, as shown in the images below, or from your Label Cart.
Shipping History - View Orders, Labels and Transactions, Print or Reprint Labels
Shipping History keeps a record of all labels purchased on the Click-N-Ship application. The Archived History tab will display one year of Legacy Click-N-Ship label history from 2/20/2024 - 2/20/2025.
The Shipping History record can be sorted by Order, Date or Total.
The actions dropdown menu in the Shipping History gives you the following tools:
|
Available Actions in Shipping History
| |
Available via the Actions Dropdown Menu (On the Order Details Page after clicking the Order Number)
| | Track | Check status of your shipment, without navigating away from the page. | | Print/Reprint* |
Print or reprint labels quickly and easily.
Note: The print option will not be available from the Archived Shipping History tab.
| | Save PDF* | Save a label in PDF format to print at your convenience. | | Ship Again | Recreate frequently used labels for faster shipping. | | Request a Refund |
Request a refund for an unused Click-N-Ship® label. Available for 30 days after label purchase.
Note: Refunds for First-Class Mail®️ such as letters or large envelopes are not available on Click-N-Ship. To request a refund, submit your request through Email Us - Click-N-Ship.
| | Create a Return Label |
Creating a return label is free and you will only be charged fees once the return label has been used. A return label cannot be created without an associated outgoing shipping label purchased through Click-N-Ship®.
Note: The Create a Return Label option will not be available from the Archived Shipping History tab or for PMOD labels
| | Cancel Refund | Cancel a pending refund request. Once the refund request has been processed, cancellation is no longer possible. | |
Available via More Actions (On the Label Details Page After Clicking the Label Number)
| | Print at Post Office |
Print a label at your Post Office by entering an email address to send a Label Broker® QR code.
Note: The Print at Post Office option will not be available from the Archived Shipping History tab.
| | Shipping Supplies Status | View the status for the Shipping Supplies that were selected during purchase of the label(s). | |
Available via Need Help (On the Label Details Page After Clicking the Label Number)
| | File an Insurance Claim | Submit an insurance claim for loss or damage of a shipped, insured item. | | Request a Refund | Request a refund for an unused Click-N-Ship® label. | | Request a Service Refund | Request a postage refund due to failure of Priority Mail Express® service only. | | *Print/Reprint and Save as PDF features are only available until midnight CST of the label's ship date. |
Shipping History Screenshots
|
Links to the Shipping History Page
|
Desktop
 
|
Mobile
 
| |
Shipping History (Order History) Page
|

 and filtering and sorting options for the Labels table.")
|
Instructions to:
Print Labels at the Post Office
If you do not have access to a printer, a retail clerk at a Post Office can print labels through the Label Broker® Feature. The label must be used on or before the shipping date on the label.
- Navigate to Shipping History.
- Select the Order History tab and select the Order Number, which acts as a link.
- On the Order Details page, find the label you want to print and click its label number, which acts as a link.
- On the Label Details page, find More Actions located on the left side.
- Select Print at the Post Office.
 - Enter your email address. You will receive an email containing a QR Code followed by 8-10 characters (Label Broker ID) and a list of suggested Post Offices that support Label Broker.
- Present the QR Code at your Post Office to print the label(s).
Save Label(s) as a PDF
The label can be saved as a PDF for more flexibility.
- Navigate to Shipping History.
- Select the Order History tab and select the Order Number, which acts as a link.
- On the Order Details page, find the label you want to save as a PDF and click its label number, which acts as a link.
- On the Label Details page, find More Actions located on the left side.
- Select Save PDF.
- Select a label printing format for your labels from the dropdown.
- Note: You have the option to print two labels per page on a Standard (8.5" x11") sheet of paper without receipts.
- Select Get PDF.
|
Click-N-Ship SCAN Form for Shipments with Multiple Packages
A Shipment Confirmation Acceptance Notice (SCAN) Form (PS Form 5630) allows customers to see that the shipment containing their package has been received by USPS and the package is pending acceptance.
- The SCAN Form features a master barcode that represents all the packages in a shipment; it is scanned when the shipment is received by the U.S. Postal Service®. This single scan enters all of the associated packages into the Postal Service USPS Tracking® database as "Shipment Accepted" and allows both the sender and the recipient to see when the package entered the mailstream.
- All Click-N-Ship transactions with two or more labels will automatically receive a SCAN Form which can be printed from the Payment Confirmation Page.
- The SCAN Form is designed to better meet customer needs regarding tracking and visibility. It is important to note that items with online postage labels will show only the "Shipment Accepted" event scan.
- With this feature, mailers will have a complete online solution for shipping expedited packages - online labels with postage, free packaging, free USPS Tracking service, free Package Pickup service, and the ability to validate shipment acceptance.
Click-N-Ship users can create, manage, print and reprint SCAN Forms from the SCAN Forms tab.
- SCAN Forms must be printed by 11:59pm CST on the Ship Date. SCAN Forms can't be printed after the Ship Date.
- Users will have up until 11:59pm CST of the label(s) Ship Date to create a new SCAN Form and can manually add labels with the same Ship Date and ship from ZIP Code.
- Only new SCAN Forms after 1/19/25 will be able to be viewed. SCAN Forms created before 1/19/25 will not be available on the Recent SCAN Forms tab.
To proceed with creating the new SCAN Form, users will be required to select the checkbox indicating that "SCAN Form labels are nonrefundable if they are not shipped with the SCAN form and that no changes can be made to the SCAN Form after printing".
Business Account Features & Pricing
Click-N-Ship Business Customers enjoy a variety of benefits including additional savings and service options.
Business Rate Card (BRC)
The Business Rate Card (BRC), offered exclusively on CNS to Business account customers, provides lower business rate prices for Priority Mail® and USPS Ground Advantage® postage purchases on the application. All business account customers are automatically enrolled into BRC and will see discounted prices without further action.
|
NOTE: Business Rate Card is a pricing structure, not a physical card. BRC pricing is available for products weighing less than 20 pounds. All items weighing 20 pounds or more will be calculated at the Commercial Rate. This includes flat rate products.
|
Commercial Pricing
All personal account customers receive Commercial Pricing when purchasing labels in Click-N-Ship. For Personal account users, Commercial rates apply to all eligible postage purchases including:
- Priority Mail®
- Priority Mail Cubic
- Priority Mail Express®
- USPS Ground Advantage®
- Ground Advantage Cubic packages
USPS Connect™
USPS Connect™ Local is a local shipping strategy that allows businesses to partner with their local Post Office to deliver Same Day and Next Day service at a fixed low cost. If Click-N-Ship business account customers are eligible for USPS Connect™ Local, then the USPS Connect™ Local products will appear in the service type drop down. Products like USPS Connect™ Local Flat Rate and USPS Connect™ Local Mail would be available based on package eligibility.
Preferences - Choose default label and account settings
Within Preferences, you will be able to update your preferred settings when creating labels using the Click-N-Ship® application to maximize your user experience. To update your Preferences, select the Preferences tab at the top of the Click-N-Ship landing page.
From Preferences you can set up the following:
- Default Create a Label Experience preference to choose between the Classic and the new Quick-Flow label creation view.
- Default return address for all labels you create (Note: This address can be different than the address in your registered USPS.com account and must be updated separately).
- Email or text notification preferences.
- Default package type options and choose between USPS Flat Rate Packaging, Custom packaging, or Letters & Large Envelope packaging.
- Default package type options and choose between USPS Flat Rate Packaging or Custom packaging.
- Default filtering and sorting preferences for Flat Rate and Custom packaging options to sort by either price or delivery time.
- Favorites Preferences that include Service Type, Mailpiece Type and Value so you can create packages more quickly by selecting Start from Favorite
- USPS Connect Preferences that set how far you're willing to travel to drop off USPS Connect packages
- Specify your preferred label printing format
- Hide Postage on Label Preferences which allows you to hide the postage amounts displayed on your Click-N-Ship labels by Service Type or specific addresses
- Business account customers can set preferences to utilize an Enterprise Payment System billing account of another user to create, purchase and ship labels on their behalf.
- Business account customers with a shared Organization ID can set a preference to share their contacts by default with their company.
System Requirements for Printer, Browsers and Software
- Laser printer or high-quality ink jet printer using black ink
- Labels can be printed on 8½" x 11" white paper
- Labels must be fully placed on the address side of the package and not folded over package edges. Use clear shipping tape to securely affix labels on all four sides. Do not tape over the "Postal Use" area on Priority Mail Express® labels or the barcodes.
- You can also purchase Self-Adhesive Labels.
- For ink jet printers, 600 dots-per-inch (DPI) are recommended.
- Our scanning equipment is not capable of reliably reading labels generated and printed using low quality Ink Jet or dot matrix printers.
- A printer is not required if selecting the Label Broker® option.
- Mozilla Firefox
- Google Chrome
- Edge
- Safari
Customers may require a first-time only download of Adobe Acrobat Reader, available at https://www.adobe.com.
Multifactor Authentication for Click-N-Ship / Reset your Password
Please see Multifactor Authentication (MFA) for information on the Multifactor Authentication process.
Please see MFA for CNS Customer User Guide for help setting up or modifying your MFA for Click-N-Ship.
For assistance resetting your password, please see How do I reset my password or change my username on USPS.com®?
|
|
|---|


\" tab that is under the paragraph that says \"Manage, organize, and edit your saved shipping labels, group them into batches, and prepare them for purchase on this page.\"")
. On the left of the banner is a warning sign followed by \"Postage Dues: $30.00 (3) View Details\". \"View Details\" is a link as well as \"Pay Now\", which is on the right side of the banner.")
